Spring JMS JmsTemplate Example
Table of Contents
Today I’m going to show you how to use the Spring JmsTemplate.
The best part?
You’re going to see a detailed example to get you up and running in record time.
So without further ado, let’s get started…
What is Spring JmsTemplate? #
The JmsTemplate is a central class from the Spring core package.
It simplifies the use of JMS and gets rid of boilerplate code. It handles the creation and release of JMS resources when sending or receiving messages.
Let’s create a code sample that shows how to configure the Spring JmsTemplate. We will send an order message to an order queue and then synchronously receive a status message from a status queue.
We start from a previous Spring JMS example with ActiveMQ.
General Project Overview #
We will use the following tools/frameworks:
- Spring JMS 5.1
- Spring Boot 2.1
- ActiveMQ 5.15
- Maven 3.6
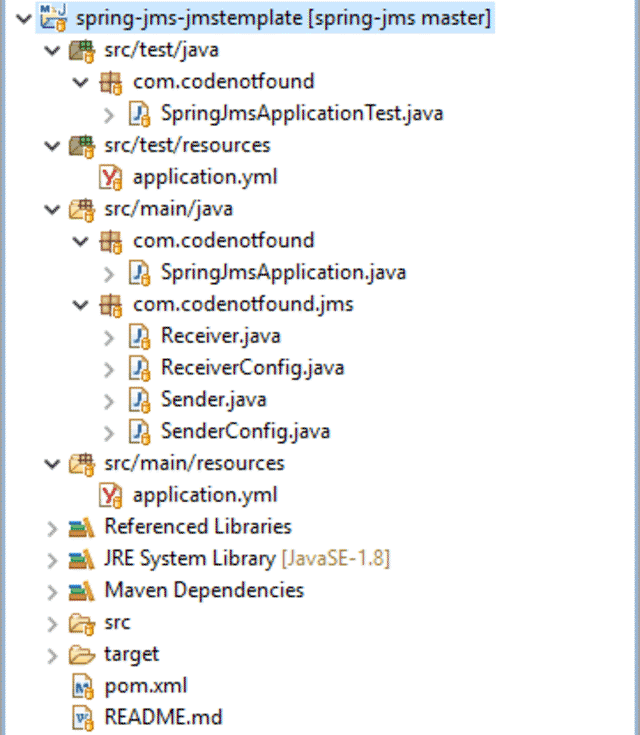
Our project has the following directory structure:
Configuring the JmsTemplate #
The JmsTemplate was originally designed to be used with a J2EE container. It was the responsibility of the container to provide the necessary pooling of the JMS resources (connections, sessions, consumers and producers).
With the development of frameworks like Spring Boot a different solution was needed. As caching of JMS resources was no longer handled by the container.
This is where the CachingConnectionFactory comes into play. It wraps a JMS provider’s connection to provide caching of sessions, connections, and producers. It also handles automatic connection recovery.
By default, it uses a single session to create many connections. If you need to scale further, you can also specify the number of sessions to cache using the sessionCacheSize property.
Configuring a CachingConnectionFactory is quite simple. Pass a ConnectionFactory and don’t forget to set the sessionCacheSize if you need to scale.
The JmsTemplate requires a reference to a ConnectionFactory. In this example, we pass the CachingConnectionFactory.
If you run on a J2EE runtime obtain the
ConnectionFactoryfrom the application’s environment naming context via JNDI.
There are a number of items that are set by default:
- Dynamic destination creation is set to
queues. - JMS Sessions are “not transacted” and “auto-acknowledged”.
- The template uses a
DynamicDestinationResolverand a SimpleMessageConverter.
In addition, we set the defaultDestination to which messages should be sent. And as we will also receive messages using the JmsTemplate we also set the receiveTimeout.
For more information check the JmsTemplate documentation.
If you use Spring JMS autoconfiguration you can use the Spring Boot JMS application properties (# JMS section) to set the above options.
package com.codenotfound.jms;

import javax.jms.Destination;
import org.apache.activemq.ActiveMQConnectionFactory;
import org.apache.activemq.command.ActiveMQQueue;
import org.springframework.beans.factory.annotation.Value;
import org.springframework.context.annotation.Bean;
import org.springframework.context.annotation.Configuration;
import org.springframework.jms.connection.CachingConnectionFactory;
import org.springframework.jms.core.JmsTemplate;

@Configuration
public class SenderConfig {

  @Value("${activemq.broker-url}")
  private String brokerUrl;

  @Value("${destination.order}")
  private String orderDestination;

  @Value("${destination.status}")
  private String statusDestination;

  @Bean
  public ActiveMQConnectionFactory senderConnectionFactory() {
    ActiveMQConnectionFactory activeMQConnectionFactory =
        new ActiveMQConnectionFactory();
    activeMQConnectionFactory.setBrokerURL(brokerUrl);

    return activeMQConnectionFactory;
  }

  @Bean
  public CachingConnectionFactory cachingConnectionFactory() {
    CachingConnectionFactory cachingConnectionFactory =
        new CachingConnectionFactory(senderConnectionFactory());
    cachingConnectionFactory.setSessionCacheSize(10);

    return cachingConnectionFactory;
  }

  @Bean
  public Destination orderDestination() {
    return new ActiveMQQueue(orderDestination);
  }

  @Bean
  public Destination statusDestination() {
    return new ActiveMQQueue(statusDestination);
  }

  @Bean
  public JmsTemplate orderJmsTemplate() {
    JmsTemplate jmsTemplate =
        new JmsTemplate(cachingConnectionFactory());
    jmsTemplate.setDefaultDestination(orderDestination());
    jmsTemplate.setReceiveTimeout(5000);

    return jmsTemplate;
  }
}
Using JmsTemplate to Send and Receive Messages #
Sending messages using the JmsTemplate can be done in two ways:
- Using send(messageCreator): The
MessageCreatorcallback interface creates the JMS message. - Using convertAndSend(message, messagePostProcessor): The
MessageConverterassigned to theJmsTemplatecreates the JMS message. TheMessagePostProcessorallows for further modification of the message after it has been processed by the converter.
We will use the second approach to send a simple order message.
Create a Sender class and auto-wire the JmsTemplate.
Define a sendOrder() method that takes an orderNumber String as parameter. The convertAndSend() method on the template will take the String and convert it into a JMS TextMessage.
We use a MessagePostProcessor to retrieve the JMSMessageID. This is a JMS header field that contains the unique identifier of the message. We will use this value to select the corresponding status message that the Receiver will return.
In the receiveOrderStatus() method we use the receiveSelectedAndConvert() method to synchronously receive a status message. This means that this method will block until it receives the message.
We use a Spring JMS message selector to receive the status for the order previously sent.
package com.codenotfound.jms;

import java.util.concurrent.atomic.AtomicReference;
import javax.jms.Destination;
import javax.jms.JMSException;
import javax.jms.Message;
import org.slf4j.Logger;
import org.slf4j.LoggerFactory;
import org.springframework.beans.factory.annotation.Autowired;
import org.springframework.jms.core.JmsTemplate;
import org.springframework.stereotype.Component;

@Component
public class Sender {

  private static final Logger LOGGER =
      LoggerFactory.getLogger(Sender.class);

  @Autowired
  private Destination statusDestination;

  @Autowired
  private JmsTemplate jmsTemplate;

  public String sendOrder(String orderNumber) throws JMSException {
    final AtomicReference<Message> message = new AtomicReference<>();

    jmsTemplate.convertAndSend(orderNumber, messagePostProcessor -> {
      message.set(messagePostProcessor);
      return messagePostProcessor;
    });

    String messageId = message.get().getJMSMessageID();
    LOGGER.info("sending OrderNumber='{}' with MessageId='{}'",
        orderNumber, messageId);

    return messageId;
  }

  public String receiveOrderStatus(String correlationId) {
    String status = (String) jmsTemplate.receiveSelectedAndConvert(
        statusDestination,
        "JMSCorrelationID = '" + correlationId + "'");
    LOGGER.info("receive Status='{}' for CorrelationId='{}'", status,
        correlationId);

    return status;
  }
}
In the Receiver class we configure a JmsListener to receive the order message.
We then create a status message on which we apply the JMS Message ID Pattern. We copy the message ID from the request to the correlation ID of the response.
This time we use the send() method on the JmsTemplate to send back the status message. In the MessageCreator we create a TextMessage and set a simple Accepted String as response.
Note that we reuse the same JmsTemplate in both Sender and Receiver class.
You can configure a single
JmsTemplateinstance and then safely inject this shared reference into multiple collaborators since the template is thread-safe.
package com.codenotfound.jms;

import javax.jms.Destination;
import javax.jms.TextMessage;
import org.slf4j.Logger;
import org.slf4j.LoggerFactory;
import org.springframework.beans.factory.annotation.Autowired;
import org.springframework.jms.annotation.JmsListener;
import org.springframework.jms.core.JmsTemplate;
import org.springframework.jms.support.JmsHeaders;
import org.springframework.messaging.handler.annotation.Header;
import org.springframework.stereotype.Component;

@Component
public class Receiver {

  @Autowired
  private Destination statusDestination;

  @Autowired
  private JmsTemplate jmsTemplate;

  private static final Logger LOGGER =
      LoggerFactory.getLogger(Receiver.class);

  @JmsListener(destination = "${destination.order}")
  public void receiveOrder(String orderNumber,
      @Header(JmsHeaders.MESSAGE_ID) String messageId) {
    LOGGER.info("received OrderNumber='{}' with MessageId='{}'",
        orderNumber, messageId);

    LOGGER.info("sending Status='Accepted' with CorrelationId='{}'",
        messageId);

    jmsTemplate.send(statusDestination, messageCreator -> {
      TextMessage message =
          messageCreator.createTextMessage("Accepted");
      message.setJMSCorrelationID(messageId);
      return message;
    });
  }
}
Testing the JmsTemplate #
To test the setup we adapt the existing test case.
We use the Sender to send out an order message. We then receive the status message and check that it contains the Accepted state.
package com.codenotfound;

import static org.assertj.core.api.Assertions.assertThat;
import org.apache.activemq.junit.EmbeddedActiveMQBroker;
import org.junit.ClassRule;
import org.junit.Test;
import org.junit.runner.RunWith;
import org.springframework.beans.factory.annotation.Autowired;
import org.springframework.boot.test.context.SpringBootTest;
import org.springframework.test.annotation.DirtiesContext;
import org.springframework.test.context.junit4.SpringRunner;
import com.codenotfound.jms.Sender;

@RunWith(SpringRunner.class)
@SpringBootTest
@DirtiesContext
public class SpringJmsApplicationTest {

  @ClassRule
  public static EmbeddedActiveMQBroker broker =
      new EmbeddedActiveMQBroker();

  @Autowired
  private Sender sender;

  @Test
  public void testReceive() throws Exception {
    String correlationId = sender.sendOrder("order-001");
    String status = sender.receiveOrderStatus(correlationId);

    assertThat(status).isEqualTo("Accepted");
  }
}
Open a command prompt in the project root directory and run the test case.
mvn test
In the output logs, we can see that the order and status messages are received.
 .   ____          _            __ _ _
/\\ / ___'_ __ _ _(_)_ __  __ _ \ \ \ \
( ( )\___ | '_ | '_| | '_ \/ _` | \ \ \ \
\\/  ___)| |_)| | | | | || (_| |  ) ) ) )
'  |____| .__|_| |_|_| |_\__, | / / / /
=========|_|==============|___/=/_/_/_/
:: Spring Boot ::        (v2.1.5.RELEASE)

2019-05-30 13:52:57.496  INFO 1968 --- [           main] c.codenotfound.SpringJmsApplicationTest  : Starting SpringJmsApplicationTest on DESKTOP-2RB3C1U with PID 1968 (started by Codenotfound in C:\Users\Codenotfound\repos\spring-jms\spring-jms-jmstemplate)
2019-05-30 13:52:57.497  INFO 1968 --- [           main] c.codenotfound.SpringJmsApplicationTest  : No active profile set, falling back to default profiles: default
2019-05-30 13:52:58.430  INFO 1968 --- [           main] c.codenotfound.SpringJmsApplicationTest  : Started SpringJmsApplicationTest in 1.264 seconds (JVM running for 2.78)
2019-05-30 13:52:58.798  INFO 1968 --- [           main] com.codenotfound.jms.Sender              : sending OrderNumber='order-001' with MessageId='ID:DESKTOP-2RB3C1U-59197-1559217176825-8:1:1:1:1'
2019-05-30 13:52:58.897  INFO 1968 --- [enerContainer-3] com.codenotfound.jms.Receiver            : received OrderNumber='order-001' with MessageId='ID:DESKTOP-2RB3C1U-59197-1559217176825-8:1:1:1:1'
2019-05-30 13:52:58.897  INFO 1968 --- [enerContainer-3] com.codenotfound.jms.Receiver            : sending Status='Accepted' with CorrelationId='ID:DESKTOP-2RB3C1U-59197-1559217176825-8:1:1:1:1'
2019-05-30 13:52:58.903  INFO 1968 --- [           main] com.codenotfound.jms.Sender              : receive Status='Accepted' for CorrelationId='ID:DESKTOP-2RB3C1U-59197-1559217176825-8:1:1:1:1'
2019-05-30 13:52:59.923  INFO 1968 --- [           main] o.a.a.junit.EmbeddedActiveMQBroker       : Stopping Embedded ActiveMQ Broker: embedded-broker
2019-05-30 13:52:59.928  INFO 1968 --- [           main] o.a.activemq.broker.TransportConnector   : Connector vm://embedded-broker stopped
2019-05-30 13:52:59.928  INFO 1968 --- [           main] o.apache.activemq.broker.BrokerService   : Apache ActiveMQ 5.15.9 (embedded-broker, ID:DESKTOP-2RB3C1U-59197-1559217176825-0:1) is shutting down
2019-05-30 13:52:59.935  INFO 1968 --- [           main] o.apache.activemq.broker.BrokerService   : Apache ActiveMQ 5.15.9 (embedded-broker, ID:DESKTOP-2RB3C1U-59197-1559217176825-0:1) uptime 3.334 seconds
2019-05-30 13:52:59.936  INFO 1968 --- [           main] o.apache.activemq.broker.BrokerService   : Apache ActiveMQ 5.15.9 (embedded-broker, ID:DESKTOP-2RB3C1U-59197-1559217176825-0:1) is shutdown
[INFO] Tests run: 1, Failures: 0, Errors: 0, Skipped: 0, Time elapsed: 3.931 s - in com.codenotfound.SpringJmsApplicationTest
[INFO]
[INFO] Results:
[INFO]
[INFO] Tests run: 1, Failures: 0, Errors: 0, Skipped: 0
[INFO]
[INFO] ------------------------------------------------------------------------
[INFO] BUILD SUCCESS
[INFO] ------------------------------------------------------------------------
[INFO] Total time:  7.074 s
[INFO] Finished at: 2019-05-30T13:53:00+02:00
[INFO] ------------------------------------------------------------------------
In this tutorial, you learned how to configure the JmsTemplate to send and receive JMS messages.
If you have any questions.
Or if you enjoyed reading.
Drop a line below!