Apache Kafka - Download and Install on Windows
Table of Contents
![]()
Apache Kafka is an open-source message broker project developed by the Apache Software Foundation written in Scala. The project aims to provide a high-throughput, low-latency platform capable of handling hundreds of megabytes of reads and writes per second from thousands of clients.
Following tutorial shows how to download and install Apache Kafka on Windows and perform a start/stop of the installed instance.
It is important to note that Kafka will not work without Apache ZooKeeper, which is essentially a distributed hierarchical key-value store. Like Kafka, ZooKeeper is a software project of the Apache Software Foundation. Kafka uses ZooKeeper for electing a controller, cluster membership, topic configuration, quotas and ACLs.
Note that for running Kafka and ZooKeeper, a Java Runtime Environment needs to be installed and configured (with JAVA_HOME correctly set). If you are not sure if Java is installed on your machine, open a console and execute the following command:
java -version
Download and Setup ZooKeeper #
![]()
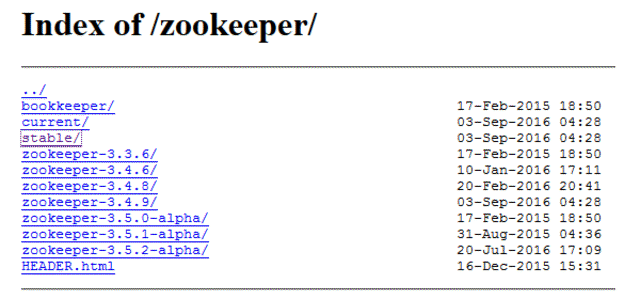
Head over to the Apache ZooKeeper download page and and click on the download link in the Download section. This will redirect to a mirror site, click on the suggested mirror link and from the index select the stable directory as shown below. Download the gzipped TAR file.
At the moment of writing this tutorial, the latest stable release was zookeeper-3.4.9.
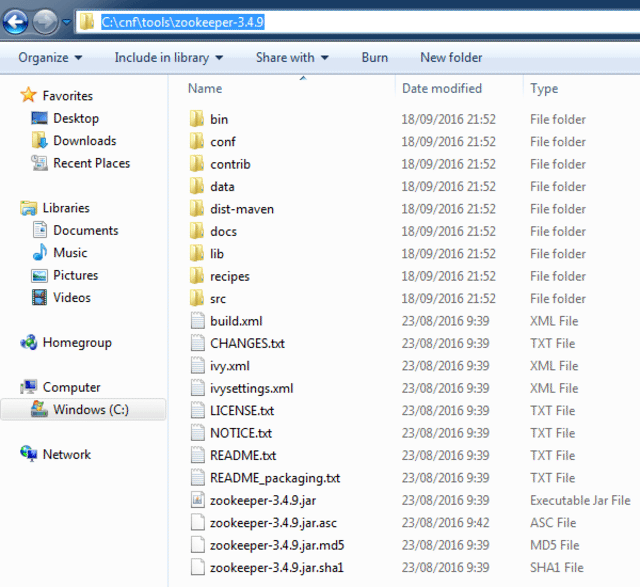
Extract the archive that was downloaded in the previous step. The extracted root directory should contain a number of files and subdirectories as shown below. From now on we will refer to this directory as: [zookeeper_install_dir].
Follow the below steps in order to setup a minimal working ZooKeeper configuration:
- Navigate to the ZooKeeper configuration directory located under
[zookeeper_install_dir]/conf. - Copy the file
zoo_sample.cfgand rename tozoo.cfg. - Open the newly created
zoo.cfgin a text editor. - Find the
dataDir=/tmp/zookeeperentry and change it todataDir=C:/temp/zookeeper. Make sure to use forward slashes in the path name! - Next, set the
ZOOKEEPER_HOMEand correspondingPATHenvironment variables. Click the Windows Start button and then typeenvwithout quotes in the search box. Select theEdit environment variables for your accountentry, this will open the environment variables window.- Add a new variable using
ZOOKEEPER_HOMEas name and[zookeeper_install_dir]as value. ClickOKto to save. - Edit (or add if it doesn’t exist) the variable with name
PATHand add;%ZOOKEEPER_HOME%\binto the end of the value. ClickOKto save.
- Add a new variable using
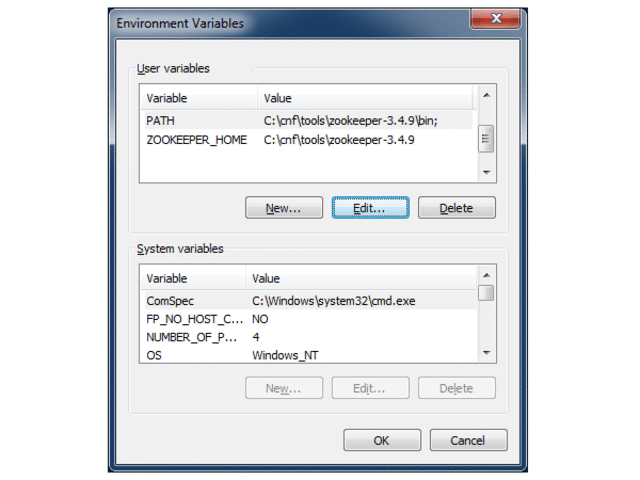
Now that ZooKeeper is configured, let’s go ahead and start it. Open a command prompt by clicking on the Windows Start button and typing cmd followed by pressing ENTER. Use the following command to startup ZooKeeper:
zkserver
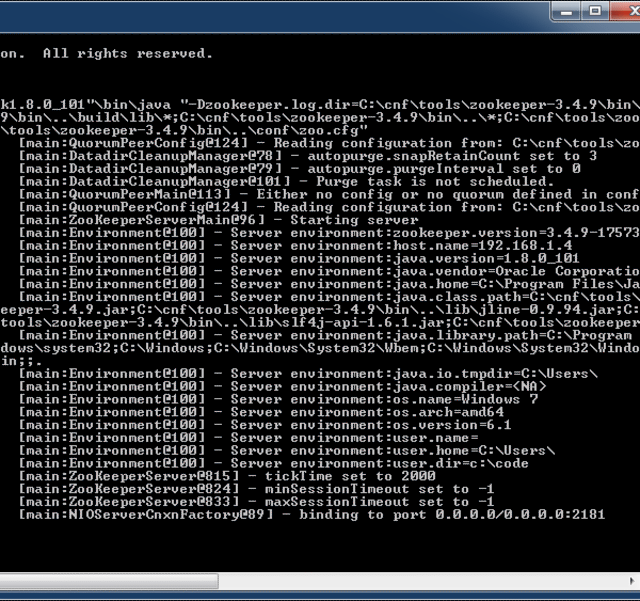
By default, ZooKeeper will generate a number of log statements at start-up as shown below. One of the log entries will mention binding to port 0.0.0.0/0.0.0.0:2181. This indicates that ZooKeeper was successfully started.
Download and Setup Kafka #
Open the Kafka releases page which contains the latest binary downloads. Kafka is written in Scala, which is a programming language that has full support for functional programming. Scala source code is intended to be compiled to Java bytecode so that the resulting executable code runs on a Java virtual machine.
You’ll notice that the release page contains multiple versions of Scala for a specific Kafka release. This only matters if you are using Scala yourself. If not the case, go ahead and choose the highest supported version.
At the moment of writing the latest stable release was kafka_2.11-0.10.0.1.tgz.
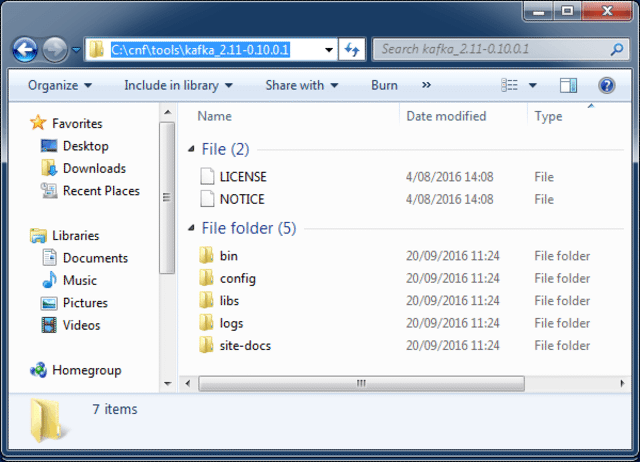
Extract the gzipped TAR file, downloaded in the previous step. The extracted root directory should contain a number of files and subdirectories as shown below. From now on we will refer to this directory as: [kafka_install_dir].
Make sure to extract to a directory path that does not contain spaces.
Follow the below steps in order to setup a minimal working Kakfa configuration:
- Navigate to the Kafka configuration directory located under
[kafka_install_dir]/config. - Edit the file
server.propertiesin a text editor. - Find the
log.dirs=/tmp/kafka-logsentry and change it tolog.dirs=C:/temp/kafka-logs. Make sure to use forward slashes in the path name!
Make sure Zookeeper is up and running before starting Kafka.
In order to start Kafka, open a command prompt by clicking on the Windows Start button and typing cmd followed by pressing ENTER. Navigate to the [kafka_install_dir]. Use following command to startup Kafka:
.\bin\windows\kafka-server-start.bat .\config\server.properties
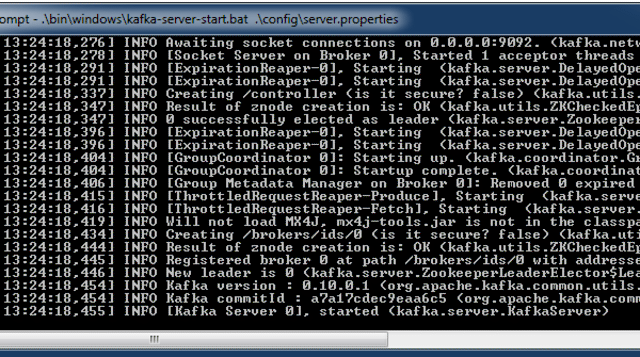
When starting, Kafka will generate a number of log statements as shown below. The last log entries will mention [Kafka Server 01], started. This means that a Kafka instance is up and running.
This concludes installing ZooKeeper and Kafka on Windows.
If you found this post helpful or have any questions or remarks, please leave a comment.