JSF - PrimeFaces Hello World Example using Jetty and Maven
PrimeFaces is an open source component library for JavaServer Faces (JSF). It provides a collection of mostly visual components (widgets) that can be used by JSF programmers to build the UI for a web application. An overview of these widgets can be found at the PrimeFaces showcase.
In the following tutorial, we will configure, build and run a Hello World PrimeFaces example using Jetty and Maven.
Tools used:
- JSF 2.2
- PrimeFaces 6.1
- Jetty 9.4
- Maven 3.5
First, let’s look at the below Maven POM file which contains the needed dependencies for our project. At the bottom of the dependencies list, we find the PrimeFaces library.
As PrimeFaces is built on top of JavaServer Faces we also need to include the JSF dependencies. JSF is a component based Model-View-Controller (MVC) framework which is built on top of the Servlet API so we also need to include the Servlet dependency.
In order to run our example, we need a servlet container (the component of a web server that interacts with Java servlets). There are a number of servlet containers implementations available, in the below example we will use Jetty which is a non-commercial pure Java-based HTTP (Web) server and Java Servlet container from the Eclipse Foundation.
There is a jetty-maven-plugin which allows launching a Jetty instance from a command line using Maven. The plugin has been configured so that the HTTP listener port is set to 9090 and the context path is set to codenotfound.
<?xml version="1.0" encoding="UTF-8"?>
<project xmlns="http://maven.apache.org/POM/4.0.0" xmlns:xsi="http://www.w3.org/2001/XMLSchema-instance" xsi:schemaLocation="http://maven.apache.org/POM/4.0.0 http://maven.apache.org/xsd/maven-4.0.0.xsd">
  <modelVersion>4.0.0</modelVersion>

  <groupId>com.codenotfound</groupId>
  <artifactId>jsf-primefaces-jetty</artifactId>
  <version>1.0</version>
  <packaging>war</packaging>

  <name>JSF - PrimeFaces Jetty Hello World Example</name>
  <url>https://www.codenotfound.com/jsf-primefaces-jetty-hello-world-example.html</url>

  <properties>
    <project.build.sourceEncoding>UTF-8</project.build.sourceEncoding>
    <java.version>1.8</java.version>

    <servlet.version>3.1.0</servlet.version>
    <jsf.version>2.2.15</jsf.version>
    <primefaces.version>6.1</primefaces.version>

    <maven-compiler-plugin.version>3.7.0</maven-compiler-plugin.version>
    <jetty-maven-plugin.version>9.4.8.v20171121</jetty-maven-plugin.version>
  </properties>

  <dependencies>
    <!-- Servlet -->
    <dependency>
      <groupId>javax.servlet</groupId>
      <artifactId>javax.servlet-api</artifactId>
      <version>${servlet.version}</version>
      <scope>provided</scope>
    </dependency>
    <!-- JSF -->
    <dependency>
      <groupId>com.sun.faces</groupId>
      <artifactId>jsf-api</artifactId>
      <version>${jsf.version}</version>
      <scope>compile</scope>
    </dependency>
    <dependency>
      <groupId>com.sun.faces</groupId>
      <artifactId>jsf-impl</artifactId>
      <version>${jsf.version}</version>
      <scope>compile</scope>
    </dependency>
    <!-- PrimeFaces -->
    <dependency>
      <groupId>org.primefaces</groupId>
      <artifactId>primefaces</artifactId>
      <version>${primefaces.version}</version>
    </dependency>
  </dependencies>

  <build>
    <plugins>
      <plugin>
        <groupId>org.apache.maven.plugins</groupId>
        <artifactId>maven-compiler-plugin</artifactId>
        <version>${maven-compiler-plugin.version}</version>
        <configuration>
          <source>${java.version}</source>
          <target>${java.version}</target>
        </configuration>
      </plugin>
      <plugin>
        <!-- jetty-maven-plugin -->
        <groupId>org.eclipse.jetty</groupId>
        <artifactId>jetty-maven-plugin</artifactId>
        <version>${jetty-maven-plugin.version}</version>
        <configuration>
          <httpConnector>
            <port>9090</port>
          </httpConnector>
          <webApp>
            <contextPath>/codenotfound</contextPath>
          </webApp>
        </configuration>
      </plugin>
    </plugins>
  </build>
</project>
Next is the HelloWorld class which is a simple POJO (Plain Old Java Object) that will provide data for the PrimeFaces (JSF) components. It contains the getters and setters for first and last name fields as well as a method to show a greeting.
In JSF, a class that can be accessed from a JSF page is called Managed Bean. By annotating the HelloWorld class with the @ManagedBean annotation it becomes a Managed Bean which is accessible and controlled by the JSF framework.
package com.codenotfound.primefaces;

import javax.faces.bean.ManagedBean;

@ManagedBean
public class HelloWorld {

  private String firstName = "John";
  private String lastName = "Doe";

  public String getFirstName() {
    return firstName;
  }

  public void setFirstName(String firstName) {
    this.firstName = firstName;
  }

  public String getLastName() {
    return lastName;
  }

  public void setLastName(String lastName) {
    this.lastName = lastName;
  }

  public String showGreeting() {
    return "Hello " + firstName + " " + lastName + "!";
  }
}
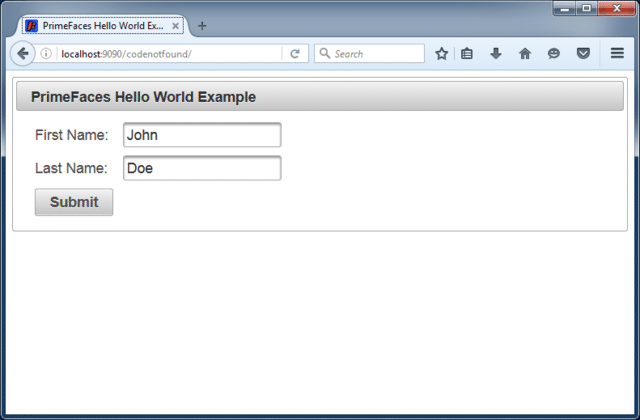
The web page that will be shown is a standard JSF page as defined below. It contains a number of PrimeFaces components which include two <p:inputText> fields, that will be used to enter a first and last name, surrounded by a <p:panel>. There is also a <p:dialog> component that shows a greeting message. The dialog is triggered by a <p:commandButton> that is part of the panel.
In order to use the PrimeFaces components, following namespace needs to be declared: xmlns:p="http://primefaces.org/ui.
<?xml version="1.0" encoding="UTF-8"?>
<!DOCTYPE html PUBLIC "-//W3C//DTD XHTML 1.0 Transitional//EN" "http://www.w3.org/TR/xhtml1/DTD/xhtml1-transitional.dtd">
<html xmlns="http://www.w3.org/1999/xhtml"
  xmlns:h="http://java.sun.com/jsf/html"
  xmlns:p="http://primefaces.org/ui">

<h:head>
  <title>PrimeFaces Hello World Example</title>
</h:head>

<h:body>
  <h:form>

    <p:panel header="PrimeFaces Hello World Example">
      <h:panelGrid columns="2" cellpadding="4">
        <h:outputText value="First Name: " />
        <p:inputText value="#{helloWorld.firstName}" />

        <h:outputText value="Last Name: " />
        <p:inputText value="#{helloWorld.lastName}" />

        <p:commandButton value="Submit" update="greeting"
          oncomplete="PF('greetingDialog').show()" />
      </h:panelGrid>
    </p:panel>

    <p:dialog header="Greeting" widgetVar="greetingDialog"
      modal="true" resizable="false">
      <h:panelGrid id="greeting" columns="1" cellpadding="4">
        <h:outputText value="#{helloWorld.showGreeting()}" />
      </h:panelGrid>
    </p:dialog>

  </h:form>
</h:body>
</html>
Java web applications use a deployment descriptor file to determine how URLs map to servlets and other information. This file is named web.xml, and resides in the application’s WAR under the WEB-INF directory.
The below web.xml contains the definition of the FacesServlet servlet class that will be used to manage the request processing lifecycle of our web page which contains JSF components. The page is mapped to the servlet by defining a mapping for all files ending with .xhtml.
<?xml version="1.0" encoding="UTF-8"?>
<web-app xmlns="http://xmlns.jcp.org/xml/ns/javaee" xmlns:xsi="http://www.w3.org/2001/XMLSchema-instance" xsi:schemaLocation="http://xmlns.jcp.org/xml/ns/javaee http://xmlns.jcp.org/xml/ns/javaee/web-app_3_1.xsd"
  version="3.1">

  <!-- File(s) appended to a request for a URL that is not mapped to a web component -->
  <welcome-file-list>
    <welcome-file>helloworld.xhtml</welcome-file>
  </welcome-file-list>

  <!-- Define the JSF servlet (manages the request processing life cycle for JavaServer Faces) -->
  <servlet>
    <servlet-name>faces-servlet</servlet-name>
    <servlet-class>javax.faces.webapp.FacesServlet</servlet-class>
    <load-on-startup>1</load-on-startup>
  </servlet>

  <!-- Map following files to the JSF servlet -->
  <servlet-mapping>
    <servlet-name>faces-servlet</servlet-name>
    <url-pattern>*.xhtml</url-pattern>
  </servlet-mapping>
</web-app>
In order to run the above example open a command prompt and execute following Maven command:
mvn jetty:run
Maven will download the needed dependencies, compile the code and start a Jetty instance on which the web application will be deployed.
The result should be the following Jetty startup trace ending with: Started Jetty Server.
[INFO] Logging initialized @2390ms to org.eclipse.jetty.util.log.Slf4jLog
[INFO] Configuring Jetty for project: JSF - PrimeFaces Jetty Hello World Example
[INFO] webAppSourceDirectory not set. Trying src\main\webapp
[INFO] Reload Mechanic: automatic
[INFO] nonBlocking:false
[INFO] Classes = C:\code\jsf-primefaces\jsf-primefaces-jetty\target\classes
[INFO] Context path = /codenotfound
[INFO] Tmp directory = C:\code\jsf-primefaces\jsf-primefaces-jetty\target\tmp
[INFO] Web defaults = org/eclipse/jetty/webapp/webdefault.xml
[INFO] Web overrides =  none
[INFO] web.xml file = file:///C:/code/jsf-primefaces/jsf-primefaces-jetty/src/main/webapp/WEB-INF/web.xml
[INFO] Webapp directory = C:\code\jsf-primefaces\jsf-primefaces-jetty\src\main\webapp
[INFO] jetty-9.4.8.v20171121, build timestamp: 2017-11-21T22:27:37+01:00, git hash: 82b8fb23f757335bb3329d540ce37a2a2615f0a8
[INFO] Scanning elapsed time=153ms
[INFO] DefaultSessionIdManager workerName=node0
[INFO] No SessionScavenger set, using defaults
[INFO] Scavenging every 600000ms
dec 29, 2017 9:59:33 PM com.sun.faces.config.ConfigureListener contextInitialized
INFO: Initializing Mojarra 2.2.15 ( 20171010-0603 637515cda4a29e3ba435e847fa14d55f2fff71a7) for context '/codenotfound'
dec 29, 2017 9:59:33 PM com.sun.faces.spi.InjectionProviderFactory createInstance
INFO: JSF1048: PostConstruct/PreDestroy annotations present.  ManagedBeans methods marked with these annotations will have said annotations processed.
dec 29, 2017 9:59:34 PM org.primefaces.webapp.PostConstructApplicationEventListener processEvent
INFO: Running on PrimeFaces 6.1
[INFO] Started o.e.j.m.p.JettyWebAppContext@7159139f{/codenotfound,[file:///C:/code/jsf-primefaces/jsf-primefaces-jetty/src/main/webapp/, jar:file:///C:/code/local-repo/com/sun/faces/jsf-impl/2.2.15/jsf-impl-2.2.15.jar!/META-INF/resources, jar:file:///C:/code/local-repo/org/primefaces/primefaces/6.1/primefaces-6.1.jar!/META-INF/resources],AVAILABLE}{file:///C:/code/jsf-primefaces/jsf-primefaces-jetty/src/main/webapp/}
[INFO] Started ServerConnector@484149eb{HTTP/1.1,[http/1.1]}{0.0.0.0:9090}
[INFO] Started @4582ms
[INFO] Started Jetty Server
Open a web browser and enter following URL: http://localhost:9090/codenotfound/. The result should be that below page is displayed:

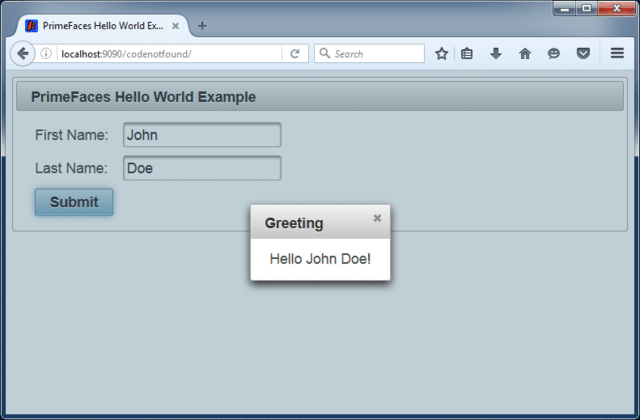
Enter a first and last name and press the Submit button. A pop-up dialog will be shown with a greeting message.

This concludes the PrimeFaces Hello World example. If you found this post helpful or have any questions or remarks, please leave a comment.