Spring JMS Annotations Example
Table of Contents
In this post I’m going to show you EXACTLY how to auto-configure Spring JMS using annotations and Spring Boot.
So if you want to get up and running with a minimum amount of coding, then you’ll love this guide.
Let’s jump right in…
What is Spring Boot Auto-Configuration? #
Spring Boot auto-configuration will try to automatically configure your Spring application based on the JAR dependencies that are available.
In other words, if the spring-jms and activemq-broker dependencies are on the classpath and you have not manually configured the ConnectionFactory, JmsTemplate or JmsListenerContainerFactory beans, then Spring Boot will auto-configure them for you using default values.
To show this behavior we will start from a previous Spring JMS tutorial in which we send/receive messages to/from ActiveMQ using Spring JMS.
The original code will be reduced to a bare minimum in order to demonstrate Spring Boot’s autoconfiguration capabilities.
We will also use Spring JMS annotations to ease the JMS implementation.
General Project Overview #
We will use the following tools/frameworks:
- Spring JMS 5.1
- Spring Boot 2.1
- ActiveMQ 5.15
- Maven 3.6
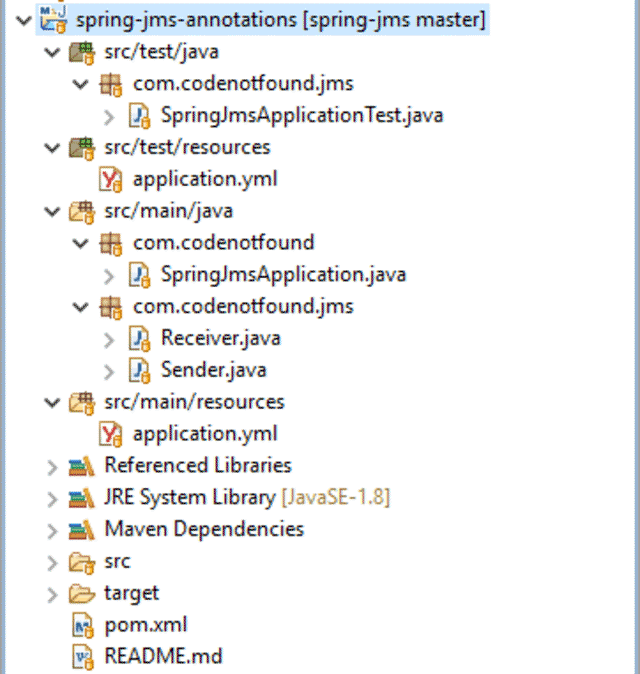
Our project has the following directory structure:
Maven Setup #
The example project is managed using Maven.
Needed dependencies like Spring Boot and Spring JMS are included by declaring the spring-boot-starter-activemq Spring Boot starter in the POM file as shown below.
<?xml version="1.0" encoding="UTF-8"?>
<project xmlns="http://maven.apache.org/POM/4.0.0" xmlns:xsi="http://www.w3.org/2001/XMLSchema-instance"
  xsi:schemaLocation="http://maven.apache.org/POM/4.0.0 http://maven.apache.org/xsd/maven-4.0.0.xsd">
  <modelVersion>4.0.0</modelVersion>

  <groupId>com.codenotfound</groupId>
  <artifactId>spring-jms-annotations</artifactId>
  <version>0.0.1-SNAPSHOT</version>

  <name>spring-jms-annotations</name>
  <description>Spring JMS Annotations Example</description>
  <url>https://codenotfound.com/spring-jms-annotations-example.html</url>

  <parent>
    <groupId>org.springframework.boot</groupId>
    <artifactId>spring-boot-starter-parent</artifactId>
    <version>2.1.1.RELEASE</version>
    <relativePath /><!-- lookup parent from repository -->
  </parent>

  <properties>
    <java.version>1.8</java.version>
  </properties>

  <dependencies>
    <dependency>
      <groupId>org.springframework.boot</groupId>
      <artifactId>spring-boot-starter-activemq</artifactId>
    </dependency>
    <dependency>
      <groupId>org.springframework.boot</groupId>
      <artifactId>spring-boot-starter-test</artifactId>
      <scope>test</scope>
    </dependency>
  </dependencies>

  <build>
    <plugins>
      <plugin>
        <groupId>org.springframework.boot</groupId>
        <artifactId>spring-boot-maven-plugin</artifactId>
      </plugin>
    </plugins>
  </build>
</project>
Spring Boot Setup #
The main SpringJmsApplication class remains untouched.
Note that in order for the auto-configuration to work we need to opt-in by adding the @EnableAutoConfiguration or @SpringBootApplication annotation to one of our @Configuration classes.
Only ever add one
@EnableAutoConfigurationannotation. It is recommended to add it to your primary@Configurationclass.
package com.codenotfound;

import org.springframework.boot.SpringApplication;
import org.springframework.boot.autoconfigure.SpringBootApplication;

@SpringBootApplication
public class SpringJmsApplication {

  public static void main(String[] args) {
    SpringApplication.run(SpringJmsApplication.class, args);
  }
}
Autoconfigure the Spring JMS Message Producer #
The setup and creation of the JmsTemplate and ConnectionFactory beans are automatically done by Spring Boot. We just need to auto-wire the JmsTemplate and use it in the send() method.
By annotating the
Senderclass with@Component, Spring will instantiate this class as a bean that we will use in a below test case. In order for this to work, we also need the@EnableAutoConfigurationwhich was indirectly specified onSpringJmsApplicationby using the@SpringBootApplicationannotation.
package com.codenotfound.jms;

import org.slf4j.Logger;
import org.slf4j.LoggerFactory;
import org.springframework.beans.factory.annotation.Autowired;
import org.springframework.jms.core.JmsTemplate;
import org.springframework.stereotype.Component;

@Component
public class Sender {

  private static final Logger LOGGER =
      LoggerFactory.getLogger(Sender.class);

  @Autowired
  private JmsTemplate jmsTemplate;

  public void send(String destination, String message) {
    LOGGER.info("sending message='{}' to destination='{}'", message,
        destination);
    jmsTemplate.convertAndSend(destination, message);
  }
}
Autoconfigure the Spring JMS Message Consumer #
Similar to the Sender, the setup and creation of the ConnectionFactory and JmsListenerContainerFactory beans are automatically done by Spring Boot. The @JmsListener annotation creates a message listener container for the annotated receive() method.
The destination name is specified using the ${destination.boot} placeholder for which the value will be fetched from the application.yml properties file.
package com.codenotfound.jms;

import java.util.concurrent.CountDownLatch;
import org.slf4j.Logger;
import org.slf4j.LoggerFactory;
import org.springframework.jms.annotation.JmsListener;
import org.springframework.stereotype.Component;

@Component
public class Receiver {

  private static final Logger LOGGER =
      LoggerFactory.getLogger(Receiver.class);

  private CountDownLatch latch = new CountDownLatch(1);

  public CountDownLatch getLatch() {
    return latch;
  }

  @JmsListener(destination = "${queue.boot}")
  public void receive(String message) {
    LOGGER.info("received message='{}'", message);
    latch.countDown();
  }
}
Using application properties we can further fine-tune the different settings of the ConnectionFactory, JmsTemplate and JmsListenerContainerFactory beans.
Scroll down to # ACTIVEMQ and # JMS sections in the following link in order to get a complete overview on all the available ActiveMQ and JMS properties.
In this example, we use default values and only specify the destination and broker URL in the included application.yml properties file.
spring:
  activemq:
    broker-url: tcp://localhost:61616

queue:
  boot: boot.q
Testing the Sender and Receiver #
In order to verify that our code works, a simple SpringJmsApplicationTest test case is used.
It contains a testReceive() unit test case that uses the Sender to send a message to the boot.q queue on the ActiveMQ broker. We then use the CountDownLatch from the Receiver to verify that a message was successfully received.
We include a dedicated application.yml properties file for testing under src/test/resources that does not contain a broker URL.
If Spring Boot does not find a broker URL, auto-configuration will automatically start an embedded ActiveMQ broker instance.
package com.codenotfound.jms;

import static org.assertj.core.api.Assertions.assertThat;
import java.util.concurrent.TimeUnit;
import org.junit.Test;
import org.junit.runner.RunWith;
import org.springframework.beans.factory.annotation.Autowired;
import org.springframework.boot.test.context.SpringBootTest;
import org.springframework.test.annotation.DirtiesContext;
import org.springframework.test.context.junit4.SpringRunner;

@RunWith(SpringRunner.class)
@SpringBootTest
@DirtiesContext
public class SpringJmsApplicationTest {

  @Autowired
  private Sender sender;

  @Autowired
  private Receiver receiver;

  @Test
  public void testReceive() throws Exception {
    sender.send("boot.q", "Hello Boot!");

    receiver.getLatch().await(10000, TimeUnit.MILLISECONDS);
    assertThat(receiver.getLatch().getCount()).isEqualTo(0);
  }
}
Let’s run the test case. Execute the following Maven command at the command prompt:
mvn test
The test case will be triggered resulting in following log statements:
 .   ____          _            __ _ _
/\\ / ___'_ __ _ _(_)_ __  __ _ \ \ \ \
( ( )\___ | '_ | '_| | '_ \/ _` | \ \ \ \
\\/  ___)| |_)| | | | | || (_| |  ) ) ) )
'  |____| .__|_| |_|_| |_\__, | / / / /
=========|_|==============|___/=/_/_/_/
:: Spring Boot ::        (v2.1.5.RELEASE)

2019-05-30 12:27:28.951  INFO 13652 --- [           main] c.c.jms.SpringJmsApplicationTest         : Starting SpringJmsApplicationTest on DESKTOP-2RB3C1U with PID 13652 (started by Codenotfound in C:\Users\Codenotfound\repos\spring-jms\spring-jms-annotations)
2019-05-30 12:27:28.952  INFO 13652 --- [           main] c.c.jms.SpringJmsApplicationTest         : No active profile set, falling back to default profiles: default
2019-05-30 12:27:30.290  INFO 13652 --- [           main] o.apache.activemq.broker.BrokerService   : Using Persistence Adapter: MemoryPersistenceAdapter
2019-05-30 12:27:30.399  INFO 13652 --- [  JMX connector] o.a.a.broker.jmx.ManagementContext       : JMX consoles can connect to service:jmx:rmi:///jndi/rmi://localhost:1099/jmxrmi
2019-05-30 12:27:30.462  INFO 13652 --- [           main] o.apache.activemq.broker.BrokerService   : Apache ActiveMQ 5.15.9 (localhost, ID:DESKTOP-2RB3C1U-58892-1559212050331-0:1) is starting
2019-05-30 12:27:30.471  INFO 13652 --- [           main] o.apache.activemq.broker.BrokerService   : Apache ActiveMQ 5.15.9 (localhost, ID:DESKTOP-2RB3C1U-58892-1559212050331-0:1) started
2019-05-30 12:27:30.471  INFO 13652 --- [           main] o.apache.activemq.broker.BrokerService   : For help or more information please see: http://activemq.apache.org
2019-05-30 12:27:30.501  INFO 13652 --- [           main] o.a.activemq.broker.TransportConnector   : Connector vm://localhost started
2019-05-30 12:27:30.542  INFO 13652 --- [           main] c.c.jms.SpringJmsApplicationTest         : Started SpringJmsApplicationTest in 1.963 seconds (JVM running for 3.007)
2019-05-30 12:27:30.898  INFO 13652 --- [           main] com.codenotfound.jms.Sender              : sending message='Hello Boot!' to destination='boot.q'
2019-05-30 12:27:30.920  INFO 13652 --- [enerContainer-1] com.codenotfound.jms.Receiver            : received message='Hello Boot!'
2019-05-30 12:27:31.938  INFO 13652 --- [           main] o.a.activemq.broker.TransportConnector   : Connector vm://localhost stopped
2019-05-30 12:27:31.938  INFO 13652 --- [           main] o.apache.activemq.broker.BrokerService   : Apache ActiveMQ 5.15.9 (localhost, ID:DESKTOP-2RB3C1U-58892-1559212050331-0:1) is shutting down
2019-05-30 12:27:31.953  INFO 13652 --- [           main] o.apache.activemq.broker.BrokerService   : Apache ActiveMQ 5.15.9 (localhost, ID:DESKTOP-2RB3C1U-58892-1559212050331-0:1) uptime 1.870 seconds
2019-05-30 12:27:31.953  INFO 13652 --- [           main] o.apache.activemq.broker.BrokerService   : Apache ActiveMQ 5.15.9 (localhost, ID:DESKTOP-2RB3C1U-58892-1559212050331-0:1) is shutdown
[INFO] Tests run: 1, Failures: 0, Errors: 0, Skipped: 0, Time elapsed: 4.001 s - in com.codenotfound.jms.SpringJmsApplicationTest
[INFO]
[INFO] Results:
[INFO]
[INFO] Tests run: 1, Failures: 0, Errors: 0, Skipped: 0
[INFO]
[INFO] ------------------------------------------------------------------------
[INFO] BUILD SUCCESS
[INFO] ------------------------------------------------------------------------
[INFO] Total time:  7.329 s
[INFO] Finished at: 2019-05-30T12:27:32+02:00
[INFO] ------------------------------------------------------------------------
In the above example, we were able to autoconfigure a JMS connection to ActiveMQ using Spring annotations and a couple of lines of code.
Drop a comment in case you thought the example was helpful or if you found something was missing.
Thanks!