Spring Kafka Consumer Producer Example
Table of Contents
In this post, you’re going to learn how to create a Spring Kafka Hello World example that uses Spring Boot and Maven.
(Step-by-step)
So if you’re a Spring Kafka beginner, you’ll love this guide.
Let’s get started.
What is Spring Kafka? #
The Spring for Apache Kafka (spring-kafka) project applies core Spring concepts to the development of Kafka-based messaging solutions.
It provides a ’template’ as a high-level abstraction for sending messages. It also contains support for Message-driven POJOs with @KafkaListener annotations and a listener container.
Spring Kafka is a Spring main project. It is developed and maintained by Pivotal Software.
To show how Spring Kafka works let’s create a simple Hello World example. We will build a sender to produce the message and a receiver to consume the message.
General Project Overview #
Tools used:
- Spring Kafka 2.2
- Spring Boot 2.1
- Maven 3.5
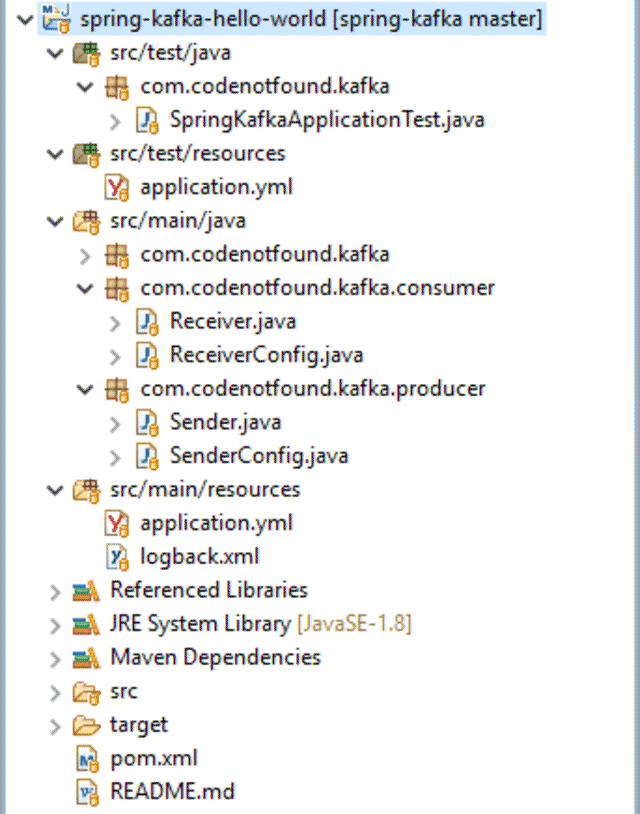
Our project has the following directory structure:
Maven Setup #
We build and run our example using Maven. If not already done, download and install Apache Maven.
Let’s use Spring Initializr to generate our Maven project. Make sure to select Kafka as a dependency.
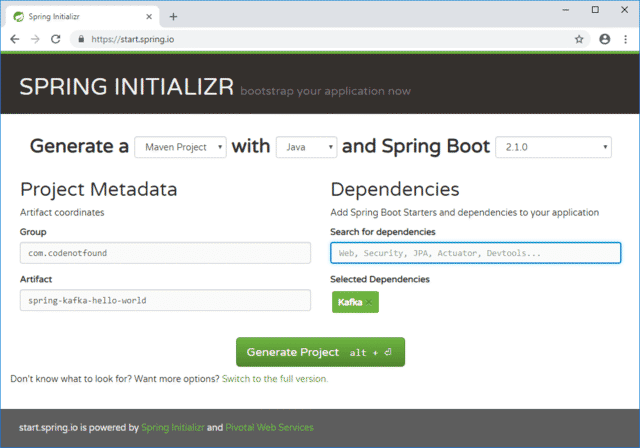
Click Generate Project to generate and download the Spring Boot project template. At the root of the project, you’ll find a pom.xml file which is the XML representation of the Maven project.
To avoid having to manage the version compatibility of the different Spring dependencies, we will inherit the defaults from the spring-boot-starter-parent parent POM.
The generated project contains Spring Boot Starters that manage the different Spring dependencies.
The spring-boot-starter dependency is the core starter, it includes auto-configuration, logging, and YAML support. The spring-boot-starter-test includes the dependencies for testing Spring Boot applications with libraries that include JUnit, Hamcrest and Mockito.
A dependency on spring-kafka is added. We also include spring-kafka-test to have access to an embedded Kafka broker when running our unit test.
Note that the version of Spring Kafka is linked to the version of the Apache Kafka client that is used. You need to align the version of Spring Kafka to the version of the Kafka broker you connect to. For more information consult the complete Kafka client compatibility list.
In the plugins section, you’ll find the Spring Boot Maven Plugin: spring-boot-maven-plugin. It allows us to build a single, runnable “uber-jar”. This is a convenient way to execute and transport code. Also, the plugin allows you to start the example via a Maven command.
<?xml version="1.0" encoding="UTF-8"?>
<project xmlns="http://maven.apache.org/POM/4.0.0" xmlns:xsi="http://www.w3.org/2001/XMLSchema-instance"
  xsi:schemaLocation="http://maven.apache.org/POM/4.0.0 http://maven.apache.org/xsd/maven-4.0.0.xsd">
  <modelVersion>4.0.0</modelVersion>

  <groupId>com.codenotfound</groupId>
  <artifactId>spring-kafka-hello-world</artifactId>
  <version>0.0.1-SNAPSHOT</version>

  <name>spring-kafka-hello-world</name>
  <description>Spring Kafka - Consumer Producer Example</description>
  <url>https://www.codenotfound.com/spring-kafka-consumer-producer-example.html</url>

  <parent>
    <groupId>org.springframework.boot</groupId>
    <artifactId>spring-boot-starter-parent</artifactId>
    <version>2.1.0.RELEASE</version>
    <relativePath /> <!-- lookup parent from repository -->
  </parent>

  <properties>
    <project.build.sourceEncoding>UTF-8</project.build.sourceEncoding>
    <project.reporting.outputEncoding>UTF-8</project.reporting.outputEncoding>
    <java.version>1.8</java.version>
  </properties>

  <dependencies>
    <dependency>
      <groupId>org.springframework.boot</groupId>
      <artifactId>spring-boot-starter</artifactId>
    </dependency>
    <dependency>
      <groupId>org.springframework.kafka</groupId>
      <artifactId>spring-kafka</artifactId>
    </dependency>

    <dependency>
      <groupId>org.springframework.boot</groupId>
      <artifactId>spring-boot-starter-test</artifactId>
      <scope>test</scope>
    </dependency>
    <dependency>
      <groupId>org.springframework.kafka</groupId>
      <artifactId>spring-kafka-test</artifactId>
      <scope>test</scope>
    </dependency>
  </dependencies>

  <build>
    <plugins>
      <plugin>
        <groupId>org.springframework.boot</groupId>
        <artifactId>spring-boot-maven-plugin</artifactId>
      </plugin>
    </plugins>
  </build>

</project>
Spring Boot Setup #
We use Spring Boot so that we have a Spring Kafka application that you can “just run”. Start by creating a SpringKafkaApplication class. It contains the main() method that uses Spring Boot’s SpringApplication.run() to launch the application.
Note that
@SpringBootApplicationis a convenience annotation that adds:@Configuration,@EnableAutoConfiguration, and@ComponentScan.
For more information on Spring Boot, check the Spring Boot getting started guide.
package com.codenotfound.kafka;

import org.springframework.boot.SpringApplication;
import org.springframework.boot.autoconfigure.SpringBootApplication;

@SpringBootApplication
public class SpringKafkaApplication {

  public static void main(String[] args) {
    SpringApplication.run(SpringKafkaApplication.class, args);
  }
}
The below sections will detail how to create a sender and receiver together with their respective configurations. It is also possible to have Spring Boot autoconfigure Spring Kafka using default values so that actual code that needs to be written is reduced to a bare minimum.
Create an application.yml YAML properties file under src/main/resources. Properties from this file will be injected by Spring Boot into our configuration beans using the @Value annotation.
kafka:
  bootstrap-servers: localhost:9092
This example will send/receive a simple
String. If you would like to send more complex objects you could, for example, use an Avro Kafka serializer or the Kafka Jsonserializer that ships with Spring Kafka.
Create a Spring Kafka Message Producer #
For sending messages we will be using the KafkaTemplate which wraps a Producer and provides convenience methods to send data to Kafka topics. The template provides asynchronous send methods which return a ListenableFuture.
In the Sender class, the KafkaTemplate is auto-wired as the creation will be done further below in a separate SenderConfig class.
For this example, we will use the send() method that takes as input a String payload that needs to be sent.
Note that the Kafka broker default settings cause it to auto-create a topic when a request for an unknown topic is received.
package com.codenotfound.kafka.producer;

import org.slf4j.Logger;
import org.slf4j.LoggerFactory;
import org.springframework.beans.factory.annotation.Autowired;
import org.springframework.kafka.core.KafkaTemplate;

public class Sender {

  private static final Logger LOGGER =
      LoggerFactory.getLogger(Sender.class);

  @Autowired
  private KafkaTemplate<String, String> kafkaTemplate;

  public void send(String payload) {
    LOGGER.info("sending payload='{}'", payload);
    kafkaTemplate.send("helloworld.t", payload);
  }
}
The creation of the KafkaTemplate and Sender is handled in the SenderConfig class. The class is annotated with @Configuration which indicates that the class can be used by the Spring IoC container as a source of bean definitions.
In order to be able to use the Spring Kafka template, we need to configure a ProducerFactory and provide it in the template’s constructor.
The producer factory needs to be set with some mandatory properties amongst which the BOOTSTRAP_SERVERS_CONFIG property that specifies a list of host:port pairs used for establishing the initial connections to the Kafka cluster. Note that this value is configurable as it is fetched from the application.yml configuration file.
A message in Kafka is a key-value pair with a small amount of associated metadata. As Kafka stores and transports Byte arrays, we need to specify the format from which the key and value will be serialized. In this example we are sending a String as payload, as such we specify the StringSerializer class which will take care of the needed transformation.
For a complete list of the other configuration parameters, you can consult the Kafka ProducerConfig API.
package com.codenotfound.kafka.producer;

import java.util.HashMap;
import java.util.Map;
import org.apache.kafka.clients.producer.ProducerConfig;
import org.apache.kafka.common.serialization.StringSerializer;
import org.springframework.beans.factory.annotation.Value;
import org.springframework.context.annotation.Bean;
import org.springframework.context.annotation.Configuration;
import org.springframework.kafka.core.DefaultKafkaProducerFactory;
import org.springframework.kafka.core.KafkaTemplate;
import org.springframework.kafka.core.ProducerFactory;

@Configuration
public class SenderConfig {

  @Value("${kafka.bootstrap-servers}")
  private String bootstrapServers;

  @Bean
  public Map<String, Object> producerConfigs() {
    Map<String, Object> props = new HashMap<>();
    // list of host:port pairs used for establishing the initial connections to the Kakfa cluster
    props.put(ProducerConfig.BOOTSTRAP_SERVERS_CONFIG,
        bootstrapServers);
    props.put(ProducerConfig.KEY_SERIALIZER_CLASS_CONFIG,
        StringSerializer.class);
    props.put(ProducerConfig.VALUE_SERIALIZER_CLASS_CONFIG,
        StringSerializer.class);

    return props;
  }

  @Bean
  public ProducerFactory<String, String> producerFactory() {
    return new DefaultKafkaProducerFactory<>(producerConfigs());
  }

  @Bean
  public KafkaTemplate<String, String> kafkaTemplate() {
    return new KafkaTemplate<>(producerFactory());
  }

  @Bean
  public Sender sender() {
    return new Sender();
  }
}
Create a Spring Kafka Message Consumer #
Like with any messaging-based application, you need to create a receiver that will handle the published messages. The Receiver is nothing more than a simple POJO that defines a method for receiving messages. In the below example we named the method receive(), but you can name it anything you like.
The @KafkaListener annotation creates a ConcurrentMessageListenerContainer message listener container behind the scenes for each annotated method. To do so, a factory bean with name kafkaListenerContainerFactory is expected that we will configure in the next section.
Using the topics element, we specify the topics for this listener.
For more information on the other available elements on the KafkaListener, you can consult the API documentation.
For testing convenience, we added a
CountDownLatch. This allows the POJO to signal that a message is received. This is something you are not likely to implement in a production application.
package com.codenotfound.kafka.consumer;

import java.util.concurrent.CountDownLatch;
import org.slf4j.Logger;
import org.slf4j.LoggerFactory;
import org.springframework.kafka.annotation.KafkaListener;

public class Receiver {

  private static final Logger LOGGER =
      LoggerFactory.getLogger(Receiver.class);

  private CountDownLatch latch = new CountDownLatch(1);

  public CountDownLatch getLatch() {
    return latch;
  }

  @KafkaListener(topics = "helloworld.t")
  public void receive(String payload) {
    LOGGER.info("received payload='{}'", payload);
    latch.countDown();
  }
}
The creation and configuration of the different Spring Beans needed for the Receiver POJO are grouped in the ReceiverConfig class. Similar to the SenderConfig it is annotated with @Configuration.
Note the
@EnableKafkaannotation which enables the detection of the@KafkaListenerannotation that was used on the previousReceiverclass.
The kafkaListenerContainerFactory() is used by the @KafkaListener annotation from the Receiver in order to configure a MessageListenerContainer. To create it, a ConsumerFactory and accompanying configuration Map is needed.
In this example, a number of mandatory properties are set amongst which the initial connection and deserializer parameters.
We also specify a GROUP_ID_CONFIG which allows to identify the group this consumer belongs to. Messages will be load balanced over consumer instances that have the same group id.
On top of that, we also set AUTO_OFFSET_RESET_CONFIG to earliest. This ensures that our consumer reads from the beginning of the topic even if some messages were already sent before it was able to startup.
For a complete list of the other configuration parameters, you can consult the Kafka ConsumerConfig API.
package com.codenotfound.kafka.consumer;

import java.util.HashMap;
import java.util.Map;
import org.apache.kafka.clients.consumer.ConsumerConfig;
import org.apache.kafka.common.serialization.StringDeserializer;
import org.springframework.beans.factory.annotation.Value;
import org.springframework.context.annotation.Bean;
import org.springframework.context.annotation.Configuration;
import org.springframework.kafka.annotation.EnableKafka;
import org.springframework.kafka.config.ConcurrentKafkaListenerContainerFactory;
import org.springframework.kafka.config.KafkaListenerContainerFactory;
import org.springframework.kafka.core.ConsumerFactory;
import org.springframework.kafka.core.DefaultKafkaConsumerFactory;
import org.springframework.kafka.listener.ConcurrentMessageListenerContainer;

@Configuration
@EnableKafka
public class ReceiverConfig {

  @Value("${kafka.bootstrap-servers}")
  private String bootstrapServers;

  @Bean
  public Map<String, Object> consumerConfigs() {
    Map<String, Object> props = new HashMap<>();
    // list of host:port pairs used for establishing the initial connections to the Kafka cluster
    props.put(ConsumerConfig.BOOTSTRAP_SERVERS_CONFIG,
        bootstrapServers);
    props.put(ConsumerConfig.KEY_DESERIALIZER_CLASS_CONFIG,
        StringDeserializer.class);
    props.put(ConsumerConfig.VALUE_DESERIALIZER_CLASS_CONFIG,
        StringDeserializer.class);
    // allows a pool of processes to divide the work of consuming and processing records
    props.put(ConsumerConfig.GROUP_ID_CONFIG, "helloworld");
    // automatically reset the offset to the earliest offset
    props.put(ConsumerConfig.AUTO_OFFSET_RESET_CONFIG, "earliest");

    return props;
  }

  @Bean
  public ConsumerFactory<String, String> consumerFactory() {
    return new DefaultKafkaConsumerFactory<>(consumerConfigs());
  }

  @Bean
  public KafkaListenerContainerFactory<ConcurrentMessageListenerContainer<String, String>> kafkaListenerContainerFactory() {
    ConcurrentKafkaListenerContainerFactory<String, String> factory =
        new ConcurrentKafkaListenerContainerFactory<>();
    factory.setConsumerFactory(consumerFactory());

    return factory;
  }

  @Bean
  public Receiver receiver() {
    return new Receiver();
  }
}
Testing the Spring Kafka Template & Listener #
A basic SpringKafkaApplicationTest is provided to verify that we are able to send and receive a message to and from Apache Kafka. It contains a testReceiver() unit test case that uses the Sender bean to send a message to the helloworld.t topic on the Kafka bus.
We then check if the CountDownLatch from the Receiver was lowered from 1 to 0 as this indicates a message was processed by the receive() method.
An embedded Kafka broker is started by using the @EmbeddedKafka annotation.
As the embedded server is started on a random port, we provide a dedicated src/test/resources/apppication.yml properties file for testing which uses the spring.embedded.kafka.brokers system property to set the correct address of the broker(s).
kafka:
  bootstrap-servers: ${spring.embedded.kafka.brokers}
Below test case can also be executed after you install Kafka and Zookeeper on your local system. Just comment out
@EmbeddedKafkaand change thebootstrap-serversproperty of the application properties file located insrc/test/resourcesto the address of the local broker.
package com.codenotfound.kafka;

import static org.assertj.core.api.Assertions.assertThat;
import java.util.concurrent.TimeUnit;
import org.junit.Test;
import org.junit.runner.RunWith;
import org.springframework.beans.factory.annotation.Autowired;
import org.springframework.boot.test.context.SpringBootTest;
import org.springframework.kafka.test.context.EmbeddedKafka;
import org.springframework.test.annotation.DirtiesContext;
import org.springframework.test.context.junit4.SpringRunner;
import com.codenotfound.kafka.consumer.Receiver;
import com.codenotfound.kafka.producer.Sender;

@RunWith(SpringRunner.class)
@SpringBootTest
@DirtiesContext
@EmbeddedKafka(partitions = 1,
    topics = {SpringKafkaApplicationTest.HELLOWORLD_TOPIC})
public class SpringKafkaApplicationTest {

  static final String HELLOWORLD_TOPIC = "helloworld.t";

  @Autowired
  private Receiver receiver;

  @Autowired
  private Sender sender;

  @Test
  public void testReceive() throws Exception {
    sender.send("Hello Spring Kafka!");

    receiver.getLatch().await(10000, TimeUnit.MILLISECONDS);
    assertThat(receiver.getLatch().getCount()).isEqualTo(0);
  }
}
In order to run above test case, open a command prompt in the project root folder and execute following Maven command:
mvn test
The result is a successful build during which a Hello World message is sent and received using Kafka.
.   ____          _            __ _ _
/\\ / ___'_ __ _ _(_)_ __  __ _ \ \ \ \
( ( )\___ | '_ | '_| | '_ \/ _` | \ \ \ \
\\/  ___)| |_)| | | | | || (_| |  ) ) ) )
'  |____| .__|_| |_|_| |_\__, | / / / /
=========|_|==============|___/=/_/_/_/
:: Spring Boot ::        (v2.1.0.RELEASE)

06:34:04.959 [main] WARN  k.server.BrokerMetadataCheckpoint - No meta.properties file under dir C:\Users\CODENO~1\AppData\Local\Temp\kafka-7816218183283567156\meta.properties
06:34:05.521 [main] WARN  k.server.BrokerMetadataCheckpoint - No meta.properties file under dir C:\Users\CODENO~1\AppData\Local\Temp\kafka-7816218183283567156\meta.properties
06:34:05.959 [main] INFO  c.c.kafka.SpringKafkaApplicationTest - Starting SpringKafkaApplicationTest on DESKTOP-2RB3C1U with PID 14968 (started by Codenotfound in C:\Users\Codenotfound\repos\spring-kafka\spring-kafka-hello-world)
06:34:05.959 [main] INFO  c.c.kafka.SpringKafkaApplicationTest - No active profile set, falling back to default profiles: default
06:34:06.943 [main] INFO  c.c.kafka.SpringKafkaApplicationTest - Started SpringKafkaApplicationTest in 3.375 seconds (JVM running for 4.482)
06:34:07.193 [main] INFO  c.codenotfound.kafka.producer.Sender - sending payload='Hello Spring Kafka!'
06:34:07.349 [org.springframework.kafka.KafkaListenerEndpointContainer#0-0-C-1] INFO  c.c.kafka.consumer.Receiver - received payload='Hello Spring Kafka!'
[INFO] Tests run: 1, Failures: 0, Errors: 0, Skipped: 0, Time elapsed: 9.406 s - in com.codenotfound.kafka.SpringKafkaApplicationTest
[INFO]
[INFO] Results:
[INFO]
[INFO] Tests run: 1, Failures: 0, Errors: 0, Skipped: 0
[INFO]
[INFO] ------------------------------------------------------------------------
[INFO] BUILD SUCCESS
[INFO] ------------------------------------------------------------------------
[INFO] Total time: 14.659 s
[INFO] Finished at: 2018-11-24T06:34:12+01:00
[INFO] ------------------------------------------------------------------------
In this getting started tutorial you learned how to create a Spring Kafka template and Spring Kafka listener to send/receive messages.
If you found this sample useful or have a question you would like to ask, drop a line below!