Spring WS WSDL Example
Table of Contents
I’m going to show you EXACTLY how to create a Spring WS Hello World SOAP web service that uses Spring Boot and Maven.
(Step-by-step)
So if you’re a Spring WS beginner, you’ll love this guide.
Let’s dive right in…
What is Spring WS? #
Spring Web Services (Spring-WS) is framework that focusses on creating document-driven Web services.
Spring-WS facilitates contract-first SOAP service development, allowing for a number of ways to manipulate XML payloads.
In this tutorial, we will create a Hello World web service. We start from a WSDL and build both consumer and provider using Spring WS, Spring Boot, and Maven.
The code is organized in such a way that you can choose to only run the client (consumer) or endpoint (provider) part.
Building a Contract First SOAP Web Service #
Spring WS is contract-first only. This means that you need to start from a contract definition (XSD or WSDL).
In this example we start from a helloworld.wsdl WSDL file. It defines a Hello World service that takes as input a person’s first and last name and returns a greeting.
<?xml version="1.0"?>
<wsdl:definitions name="HelloWorld" targetNamespace="http://codenotfound.com/services/helloworld" xmlns:tns="http://codenotfound.com/services/helloworld"
  xmlns:types="http://codenotfound.com/types/helloworld" xmlns:soap="http://schemas.xmlsoap.org/wsdl/soap/" xmlns:wsdl="http://schemas.xmlsoap.org/wsdl/">

  <wsdl:types>
    <xsd:schema targetNamespace="http://codenotfound.com/types/helloworld" xmlns:xsd="http://www.w3.org/2001/XMLSchema" elementFormDefault="qualified"
      attributeFormDefault="unqualified" version="1.0">

      <xsd:element name="person">
        <xsd:complexType>
          <xsd:sequence>
            <xsd:element name="firstName" type="xsd:string" />
            <xsd:element name="lastName" type="xsd:string" />
          </xsd:sequence>
        </xsd:complexType>
      </xsd:element>

      <xsd:element name="greeting">
        <xsd:complexType>
          <xsd:sequence>
            <xsd:element name="greeting" type="xsd:string" />
          </xsd:sequence>
        </xsd:complexType>
      </xsd:element>
    </xsd:schema>
  </wsdl:types>

  <wsdl:message name="SayHelloInput">
    <wsdl:part name="person" element="types:person" />
  </wsdl:message>

  <wsdl:message name="SayHelloOutput">
    <wsdl:part name="greeting" element="types:greeting" />
  </wsdl:message>

  <wsdl:portType name="HelloWorld_PortType">
    <wsdl:operation name="sayHello">
      <wsdl:input message="tns:SayHelloInput" />
      <wsdl:output message="tns:SayHelloOutput" />
    </wsdl:operation>
  </wsdl:portType>

  <wsdl:binding name="HelloWorld_SoapBinding" type="tns:HelloWorld_PortType">
    <soap:binding style="document" transport="http://schemas.xmlsoap.org/soap/http" />
    <wsdl:operation name="sayHello">
      <soap:operation soapAction="http://codenotfound.com/services/helloworld/sayHello" />
      <wsdl:input>
        <soap:body use="literal" />
      </wsdl:input>
      <wsdl:output>
        <soap:body use="literal" />
      </wsdl:output>
    </wsdl:operation>
  </wsdl:binding>

  <wsdl:service name="HelloWorld_Service">
    <wsdl:documentation>Hello World service</wsdl:documentation>
    <wsdl:port name="HelloWorld_Port" binding="tns:HelloWorld_SoapBinding">
      <soap:address location="http://localhost:8080/codenotfound/ws/helloworld" />
    </wsdl:port>
  </wsdl:service>

</wsdl:definitions>
General Project Overview #
We will use the following tools/frameworks:
- Spring-WS 3.0
- Spring Boot 2.1
- Maven 3.5
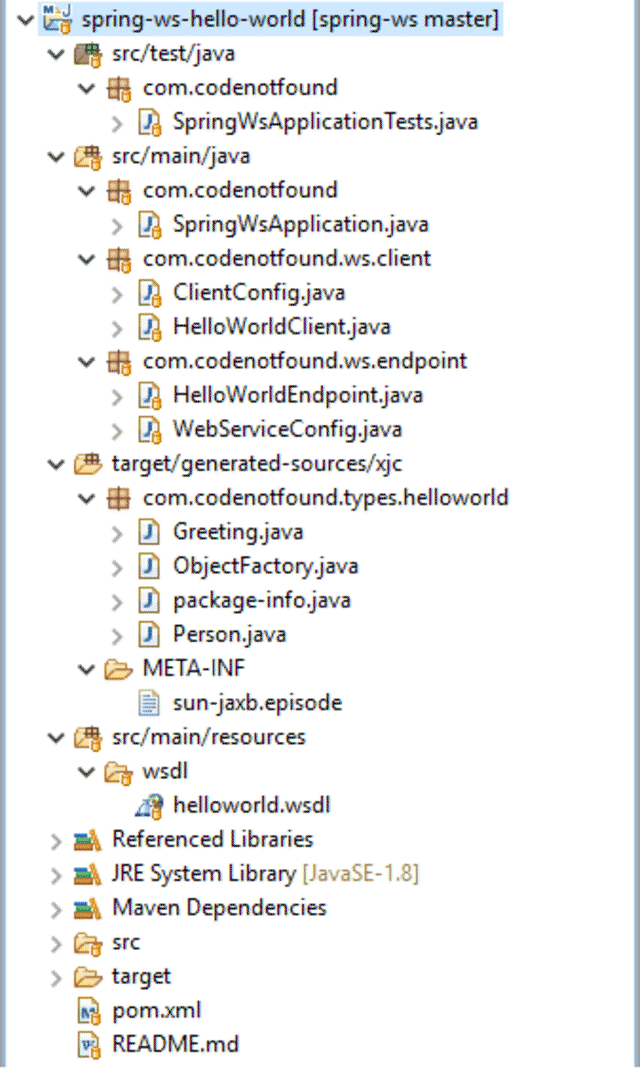
Our project has the following directory structure:
Maven Setup #
We build and run our example using Maven. If not already the case, download and install Apache Maven.
Let’s use Spring Initializr to generate our Maven project. Make sure to select Web Services as a dependency.
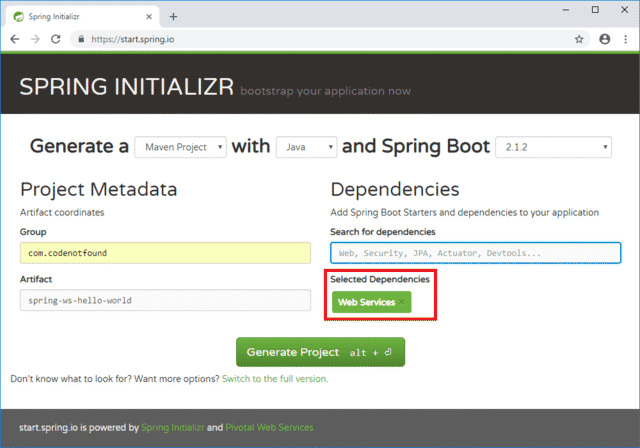
Click Generate Project to generate and download the Spring Boot project template. At the root of the project, you’ll find a pom.xml file which is the XML representation of the Maven project.
To avoid having to manage the version compatibility of the different Spring dependencies, we will inherit the defaults from the spring-boot-starter-parent parent POM.
The generated project contains Spring Boot Starters that manage the different Spring dependencies.
The spring-boot-starter-web-services dependency includes the needed dependencies for using Spring Web Services.
The spring-boot-starter-test includes the dependencies for testing Spring Boot applications with libraries that include JUnit, Hamcrest and Mockito.
In the plugins section, you’ll find the Spring Boot Maven Plugin. spring-boot-maven-plugin allows us to build a single, runnable “uber-jar”. This is a convenient way to execute and transport code.
Also, the plugin allows you to start the example via a Maven command.
<?xml version="1.0" encoding="UTF-8"?>
<project xmlns="http://maven.apache.org/POM/4.0.0" xmlns:xsi="http://www.w3.org/2001/XMLSchema-instance"
  xsi:schemaLocation="http://maven.apache.org/POM/4.0.0 http://maven.apache.org/xsd/maven-4.0.0.xsd">
  <modelVersion>4.0.0</modelVersion>

  <groupId>com.codenotfound</groupId>
  <artifactId>spring-ws-hello-world</artifactId>
  <version>0.0.1-SNAPSHOT</version>

  <name>spring-ws-hello-world</name>
  <description>Spring WS Example</description>
  <url>https://codenotfound.com/spring-ws-example.html</url>

  <parent>
    <groupId>org.springframework.boot</groupId>
    <artifactId>spring-boot-starter-parent</artifactId>
    <version>2.1.2.RELEASE</version>
    <relativePath /><!-- lookup parent from repository -->
  </parent>

  <properties>
    <java.version>1.8</java.version>
    <maven-jaxb2-plugin.version>0.14.0</maven-jaxb2-plugin.version>
  </properties>

  <dependencies>
    <dependency>
      <groupId>org.springframework.boot</groupId>
      <artifactId>spring-boot-starter-web-services</artifactId>
    </dependency>
    <dependency>
      <groupId>org.springframework.boot</groupId>
      <artifactId>spring-boot-starter-test</artifactId>
      <scope>test</scope>
    </dependency>
  </dependencies>

  <build>
    <plugins>
      <plugin>
        <groupId>org.springframework.boot</groupId>
        <artifactId>spring-boot-maven-plugin</artifactId>
      </plugin>
      <plugin>
        <groupId>org.jvnet.jaxb2.maven2</groupId>
        <artifactId>maven-jaxb2-plugin</artifactId>
        <version>${maven-jaxb2-plugin.version}</version>
        <executions>
          <execution>
            <goals>
              <goal>generate</goal>
            </goals>
          </execution>
        </executions>
        <configuration>
          <schemaDirectory>${project.basedir}/src/main/resources/wsdl</schemaDirectory>
          <schemaIncludes>
            <include>*.wsdl</include>
          </schemaIncludes>
        </configuration>
      </plugin>
    </plugins>
  </build>
</project>
We want to be able to directly use the person and greeting elements (defined in the types section of the above Hello World WSDL) in our Java code. To achieve this we will use JAXB to generate the corresponding Java classes.
The maven-jaxb2-plugin, configured in above POM file, will handle the generation.
The plugin looks into the defined <schemaDirectory> in order to find any WSDL files for which it needs to generate the Java classes.
Make sure that the
helloworld.wsdlfile is available under/src/main/resources.
Execute the following Maven command to trigger the code generation:
mvn generate-sources
This results in a number of generated Java classes under /target/generated-sources/xjc. You should find Person and Greeting. We will use these classes when we implement the client and provider of the SOAP service.
Spring Boot Setup #
Spring Boot is used in order to make a Spring WS example application that you can “just run”.
We start by creating a SpringWsApplication which contains the main() method that uses Spring Boot’s SpringApplication.run() method to launch the application.
The
@SpringBootApplicationannotation is a convenience annotation that adds:@Configuration,@EnableAutoConfigurationand@ComponentScan.
For more information on Spring Boot check out the Spring Boot getting started guide.
package com.codenotfound;

import org.springframework.boot.SpringApplication;
import org.springframework.boot.autoconfigure.SpringBootApplication;

@SpringBootApplication
public class SpringWsApplication {

  public static void main(String[] args) {
    SpringApplication.run(SpringWsApplication.class, args);
  }
}
Creating the Endpoint (Provider) #
The server-side of Spring-WS is designed around a central class called MessageDispatcher that dispatches incoming XML messages to endpoints. For more detailed information check out the reference documentation on the MessageDispatcher.
Spring Web Services supports multiple transport protocols. The most common is the HTTP transport, for which a custom MessageDispatcherServlet servlet is supplied. This is a standard Servlet which extends from the standard Spring Web DispatcherServlet (=central dispatcher for HTTP request handlers/controllers), and wraps a MessageDispatcher.
In other words: the
MessageDispatcherServletcombines the attributes of theMessageDispatcherandDispatcherServletand as a result allows the handling of XML messages over HTTP.
In the below WebServiceConfig configuration class we use a ServletRegistrationBean to register the MessageDispatcherServlet.
Note that it is important to inject and set the ApplicationContext to the MessageDispatcherServlet, otherwise it will not automatically detect other Spring Web Services related beans (such as the lower Wsdl11Definition).
By naming this bean messageDispatcherServlet, it does not replace Spring Boot’s default DispatcherServlet bean.
The servlet mapping URI pattern on the ServletRegistrationBean is set to /codenotfound/ws/*. The web container will use this path to map incoming HTTP requests to the servlet.
The DefaultWsdl11Definition exposes a standard WSDL 1.1 using the specified Hello World WSDL file. The URL location at which this WSDL is available is determined by it’s Bean name in combination with the URI mapping of the MessageDispatcherServlet.
For the example below this is: [host]=http://localhost:8080+[servlet mapping uri]=/codenotfound/ws/+[WsdlDefinition bean name]=helloworld+[WSDL postfix]=.wsdl.
Or: http://localhost:8080/codenotfound/ws/helloworld.wsdl.
To enable the support for the
@Endpointannotation that we will use in the next section we need to annotate our configuration class with@EnableWs.
package com.codenotfound.ws.endpoint;

import javax.servlet.Servlet;
import org.springframework.boot.web.servlet.ServletRegistrationBean;
import org.springframework.context.ApplicationContext;
import org.springframework.context.annotation.Bean;
import org.springframework.context.annotation.Configuration;
import org.springframework.core.io.ClassPathResource;
import org.springframework.ws.config.annotation.EnableWs;
import org.springframework.ws.config.annotation.WsConfigurerAdapter;
import org.springframework.ws.transport.http.MessageDispatcherServlet;
import org.springframework.ws.wsdl.wsdl11.SimpleWsdl11Definition;
import org.springframework.ws.wsdl.wsdl11.Wsdl11Definition;

@EnableWs
@Configuration
public class WebServiceConfig extends WsConfigurerAdapter {

  @Bean
  public ServletRegistrationBean<Servlet> messageDispatcherServlet(
      ApplicationContext applicationContext) {
    MessageDispatcherServlet servlet =
        new MessageDispatcherServlet();
    servlet.setApplicationContext(applicationContext);

    return new ServletRegistrationBean<>(servlet,
        "/codenotfound/ws/*");
  }

  @Bean(name = "helloworld")
  public Wsdl11Definition defaultWsdl11Definition() {
    SimpleWsdl11Definition wsdl11Definition =
        new SimpleWsdl11Definition();
    wsdl11Definition
        .setWsdl(new ClassPathResource("/wsdl/helloworld.wsdl"));

    return wsdl11Definition;
  }
}
Now that our MessageDispatcherServlet is defined it will try to match incoming XML messages on the defined URI with one of the available handling methods. So all we need to do is set up an Endpoint that contains a handling method that matches the incoming request. This service endpoint can be a simple POJO with a number of Spring WS annotations as shown below.
The HelloWorldEndpoint POJO is annotated with the @Endpoint annotation which registers the class with Spring WS as a potential candidate for processing incoming SOAP messages. It contains a sayHello() method that receives a Person and returns a Greeting. Note that these are the Java classes that we generated earlier using JAXB (both are annotated with @XmlRoolElement).
To indicate what sort of messages a method can handle, it is annotated with the @PayloadRoot annotation that specifies a qualified name that is defined by a namespace and a local name (=localPart). Whenever a message comes in which has this qualified name for the payload root element, the method will be invoked.
The @ResponsePayload annotation makes Spring WS map the returned value to the response payload which in our example is the JAXB Greeting object.
The @RequestPayload annotation on the sayHello() method parameter indicates that the incoming message will be mapped to the method’s request parameter. In our case, this is the JAXB Person object.
The implementation of the sayHello service simply logs the name of the received Person and then uses this name to construct a Greeting that is also logged and then returned.
package com.codenotfound.ws.endpoint;

import org.slf4j.Logger;
import org.slf4j.LoggerFactory;
import org.springframework.ws.server.endpoint.annotation.Endpoint;
import org.springframework.ws.server.endpoint.annotation.PayloadRoot;
import org.springframework.ws.server.endpoint.annotation.RequestPayload;
import org.springframework.ws.server.endpoint.annotation.ResponsePayload;
import com.codenotfound.types.helloworld.Greeting;
import com.codenotfound.types.helloworld.ObjectFactory;
import com.codenotfound.types.helloworld.Person;

@Endpoint
public class HelloWorldEndpoint {

  private static final Logger LOGGER =
      LoggerFactory.getLogger(HelloWorldEndpoint.class);

  @PayloadRoot(
      namespace = "http://codenotfound.com/types/helloworld",
      localPart = "person")
  @ResponsePayload
  public Greeting sayHello(@RequestPayload Person request) {
    LOGGER.info("Endpoint received person[firstName={},lastName={}]",
        request.getFirstName(), request.getLastName());

    String greeting = "Hello " + request.getFirstName() + " "
        + request.getLastName() + "!";

    ObjectFactory factory = new ObjectFactory();
    Greeting response = factory.createGreeting();
    response.setGreeting(greeting);

    LOGGER.info("Endpoint sending greeting='{}'",
        response.getGreeting());
    return response;
  }
}
Creating the Client (Consumer) #
Create a ClientConfig class and annotate it with @Configuration. This indicates that the class can be used by the Spring IoC container as a source of bean definitions.
The WebServiceTemplate is the core class for client-side Web service access in Spring-WS. It contains methods for sending requests and receiving response messages. Additionally, it can marshal objects to XML before sending them across a transport, and unmarshal any response XML into an object again.
As we will use JAXB to marshal our Person to a request XML and in turn unmarshal the response XML to our Greeting we need an instance of Spring’s Jaxb2Marshaller. This class requires a context path to operate, which you can set using the contextPath property. The context path is a list of colon (:) separated Java package names that contain schema derived classes.
In our example this is the package name of the generated Person and Greeting classes which is: com.codenotfound.types.helloworld.
The below ClientConfig configuration class specifies the WebServiceTemplate bean that uses the above Jaxb2Marshaller for marshaling and unmarshalling. We also set the default service URI to the service endpoint.
Note that the
helloworldat the end of thedefault-urican actually be omitted as previously we had specified “/codenotfound/ws/*” as URI of our endpoint servlet.
package com.codenotfound.ws.client;

import org.springframework.context.annotation.Bean;
import org.springframework.context.annotation.Configuration;
import org.springframework.oxm.jaxb.Jaxb2Marshaller;
import org.springframework.ws.client.core.WebServiceTemplate;

@Configuration
public class ClientConfig {

  @Bean
  Jaxb2Marshaller jaxb2Marshaller() {
    Jaxb2Marshaller jaxb2Marshaller = new Jaxb2Marshaller();
    jaxb2Marshaller
        .setContextPath("com.codenotfound.types.helloworld");

    return jaxb2Marshaller;
  }

  @Bean
  public WebServiceTemplate webServiceTemplate() {
    WebServiceTemplate webServiceTemplate = new WebServiceTemplate();
    webServiceTemplate.setMarshaller(jaxb2Marshaller());
    webServiceTemplate.setUnmarshaller(jaxb2Marshaller());
    webServiceTemplate.setDefaultUri(
        "http://localhost:8080/codenotfound/ws/helloworld");

    return webServiceTemplate;
  }
}
The client code is specified in the HelloWorldClient class. The sayHello() method creates a Person object based on the firstname and lastname input parameters.
The auto-wired WebServiceTemplate is used to marshal and send a person XML request towards the Hello World service. The result is unmarshalled to a Greeting object which is logged.
The @Component annotation will cause Spring to automatically import this bean into the container if automatic component scanning is enabled (adding the @SpringBootApplication annotation to the main SpringWsApplication class is equivalent to using @ComponentScan).
package com.codenotfound.ws.client;

import org.slf4j.Logger;
import org.slf4j.LoggerFactory;
import org.springframework.beans.factory.annotation.Autowired;
import org.springframework.stereotype.Component;
import org.springframework.ws.client.core.WebServiceTemplate;

import com.codenotfound.types.helloworld.Greeting;
import com.codenotfound.types.helloworld.ObjectFactory;
import com.codenotfound.types.helloworld.Person;

@Component
public class HelloWorldClient {

  private static final Logger LOGGER = LoggerFactory.getLogger(HelloWorldClient.class);

  @Autowired
  private WebServiceTemplate webServiceTemplate;

  public String sayHello(String firstName, String lastName) {
    ObjectFactory factory = new ObjectFactory();
    Person person = factory.createPerson();

    person.setFirstName(firstName);
    person.setLastName(lastName);

    LOGGER.info("Client sending person[firstName={},lastName={}]", person.getFirstName(),
        person.getLastName());

    Greeting greeting = (Greeting) webServiceTemplate.marshalSendAndReceive(person);

    LOGGER.info("Client received greeting='{}'", greeting.getGreeting());
    return greeting.getGreeting();
  }
}
Testing the Web Service #
Let’s create a basic unit test case in which the above client is used to send a request to the Hello World web service endpoint. We then verify if the response is equal to the expected greeting.
The @RunWith and @SpringBootTest testing annotations, that were introduced with Spring Boot 1.4, are used to tell JUnit to run using Spring’s testing support and bootstrap with Spring Boot’s support.
By setting the DEFINED_PORT web environment variable, a HTTP server is started on the port in the defined application properties. As we did not define a custom port the default value of 8080 is used.
package com.codenotfound;

import static org.assertj.core.api.Assertions.assertThat;
import org.junit.Test;
import org.junit.runner.RunWith;
import org.springframework.beans.factory.annotation.Autowired;
import org.springframework.boot.test.context.SpringBootTest;
import org.springframework.boot.test.context.SpringBootTest.WebEnvironment;
import org.springframework.test.context.junit4.SpringRunner;
import com.codenotfound.ws.client.HelloWorldClient;

@RunWith(SpringRunner.class)
@SpringBootTest(webEnvironment = WebEnvironment.DEFINED_PORT)
public class SpringWsApplicationTests {

  @Autowired
  private HelloWorldClient helloWorldClient;

  @Test
  public void testSayHello() {
    assertThat(helloWorldClient.sayHello("John", "Doe"))
        .isEqualTo("Hello John Doe!");
  }
}
To run above test, open a command prompt in the project root directory and execute following Maven command:
mvn test
The result should be a successful build during which the embedded Tomcat is started and a call is made to the Hello World service:
.   ____          _            __ _ _
/\\ / ___'_ __ _ _(_)_ __  __ _ \ \ \ \
( ( )\___ | '_ | '_| | '_ \/ _` | \ \ \ \
\\/  ___)| |_)| | | | | || (_| |  ) ) ) )
'  |____| .__|_| |_|_| |_\__, | / / / /
=========|_|==============|___/=/_/_/_/
:: Spring Boot ::        (v2.1.2.RELEASE)

2019-01-15 11:03:58.100  INFO 11376 --- [           main] c.codenotfound.SpringWsApplicationTests  : Starting SpringWsApplicationTests on DESKTOP-2RB3C1U with PID 11376 (started by Codenotfound in C:\Users\Codenotfound\repos\spring-ws\spring-ws-hello-world)
2019-01-15 11:03:58.100  INFO 11376 --- [           main] c.codenotfound.SpringWsApplicationTests  : No active profile set, falling back to default profiles: default
2019-01-15 11:03:59.287  INFO 11376 --- [           main] trationDelegate$BeanPostProcessorChecker : Bean 'webServiceConfig' of type [com.codenotfound.ws.endpoint.WebServiceConfig$$EnhancerBySpringCGLIB$$109c3f96] is not eligible for getting processed by all BeanPostProcessors (for example: not eligible for auto-proxying)
2019-01-15 11:03:59.287  INFO 11376 --- [           main] trationDelegate$BeanPostProcessorChecker : Bean 'org.springframework.ws.config.annotation.DelegatingWsConfiguration' of type [org.springframework.ws.config.annotation.DelegatingWsConfiguration$$EnhancerBySpringCGLIB$$50a1ed21] is not eligible for getting processed by all BeanPostProcessors (for example: not eligible for auto-proxying)
2019-01-15 11:03:59.350  INFO 11376 --- [           main] .w.s.a.s.AnnotationActionEndpointMapping : Supporting [WS-Addressing August 2004, WS-Addressing 1.0]
2019-01-15 11:03:59.850  INFO 11376 --- [           main] o.s.b.w.embedded.tomcat.TomcatWebServer  : Tomcat initialized with port(s): 8080 (http)
2019-01-15 11:03:59.881  INFO 11376 --- [           main] o.apache.catalina.core.StandardService   : Starting service [Tomcat]
2019-01-15 11:03:59.881  INFO 11376 --- [           main] org.apache.catalina.core.StandardEngine  : Starting Servlet engine: [Apache Tomcat/9.0.14]
2019-01-15 11:03:59.897  INFO 11376 --- [           main] o.a.catalina.core.AprLifecycleListener   : The APR based Apache Tomcat Native library which allows optimal performance in production environments was not found on the java.library.path: [C:\Program Files\Java\jdk1.8.0_181\jre\bin;C:\Windows\Sun\Java\bin;C:\Windows\system32;C:\Windows;C:\Windows\system32;C:\Windows;C:\Windows\System32\Wbem;C:\Windows\System32\WindowsPowerShell\v1.0\;C:\Windows\System32\OpenSSH\;C:\Go\bin;C:\Users\Codenotfound\AppData\Local\Microsoft\WindowsApps;C:\Program Files\Java\jdk1.8.0_181\bin;C:\Users\Codenotfound\tools\apache-maven-3.5.4\bin;C:\Users\Codenotfound\AppData\Local\GitHubDesktop\bin;C:\Users\Codenotfound\AppData\Local\atom\bin;C:\Users\Codenotfound\go\bin;C:\Users\Codenotfound\AppData\Local\Programs\Microsoft VS Code\bin;C:\Users\Codenotfound\AppData\Local\Programs\Git\cmd;C:\Flutter\bin;;.]
2019-01-15 11:04:00.037  INFO 11376 --- [           main] o.a.c.c.C.[Tomcat].[localhost].[/]       : Initializing Spring embedded WebApplicationContext
2019-01-15 11:04:00.037  INFO 11376 --- [           main] o.s.web.context.ContextLoader            : Root WebApplicationContext: initialization completed in 1906 ms
2019-01-15 11:04:00.193  INFO 11376 --- [           main] o.s.ws.soap.saaj.SaajSoapMessageFactory  : Creating SAAJ 1.3 MessageFactory with SOAP 1.1 Protocol
2019-01-15 11:04:00.756  INFO 11376 --- [           main] o.s.s.concurrent.ThreadPoolTaskExecutor  : Initializing ExecutorService 'applicationTaskExecutor'
2019-01-15 11:04:01.115  INFO 11376 --- [           main] o.s.b.w.embedded.tomcat.TomcatWebServer  : Tomcat started on port(s): 8080 (http) with context path ''
2019-01-15 11:04:01.131  INFO 11376 --- [           main] c.codenotfound.SpringWsApplicationTests  : Started SpringWsApplicationTests in 3.312 seconds (JVM running for 4.244)
2019-01-15 11:04:01.287  INFO 11376 --- [           main] c.c.ws.client.HelloWorldClient           : Client sending person[firstName=John,lastName=Doe]
2019-01-15 11:04:01.428  INFO 11376 --- [nio-8080-exec-1] o.a.c.c.C.[Tomcat].[localhost].[/]       : Initializing Spring MessageDispatcherServlet 'messageDispatcherServlet'
2019-01-15 11:04:01.428  INFO 11376 --- [nio-8080-exec-1] o.s.w.t.http.MessageDispatcherServlet    : Initializing Servlet 'messageDispatcherServlet'
2019-01-15 11:04:01.443  INFO 11376 --- [nio-8080-exec-1] o.s.ws.soap.saaj.SaajSoapMessageFactory  : Creating SAAJ 1.3 MessageFactory with SOAP 1.1 Protocol
2019-01-15 11:04:01.443  INFO 11376 --- [nio-8080-exec-1] o.s.w.t.http.MessageDispatcherServlet    : Completed initialization in 15 ms
2019-01-15 11:04:01.506  INFO 11376 --- [nio-8080-exec-1] c.c.ws.endpoint.HelloWorldEndpoint       : Endpoint received person[firstName=John,lastName=Doe]
2019-01-15 11:04:01.506  INFO 11376 --- [nio-8080-exec-1] c.c.ws.endpoint.HelloWorldEndpoint       : Endpoint sending greeting='Hello John Doe!'
2019-01-15 11:04:01.521  INFO 11376 --- [           main] c.c.ws.client.HelloWorldClient           : Client received greeting='Hello John Doe!'
[INFO] Tests run: 1, Failures: 0, Errors: 0, Skipped: 0, Time elapsed: 4.359 s - in com.codenotfound.SpringWsApplicationTests
2019-01-15 11:04:01.615  INFO 11376 --- [       Thread-3] o.s.s.concurrent.ThreadPoolTaskExecutor  : Shutting down ExecutorService 'applicationTaskExecutor'
[INFO]
[INFO] Results:
[INFO]
[INFO] Tests run: 1, Failures: 0, Errors: 0, Skipped: 0
[INFO]
[INFO] ------------------------------------------------------------------------
[INFO] BUILD SUCCESS
[INFO] ------------------------------------------------------------------------
[INFO] Total time: 8.010 s
[INFO] Finished at: 2019-01-15T11:04:02+01:00
[INFO] ------------------------------------------------------------------------
If you just want to start Spring Boot so that the endpoint is up and running, execute following Maven command.
mvn spring-boot:run
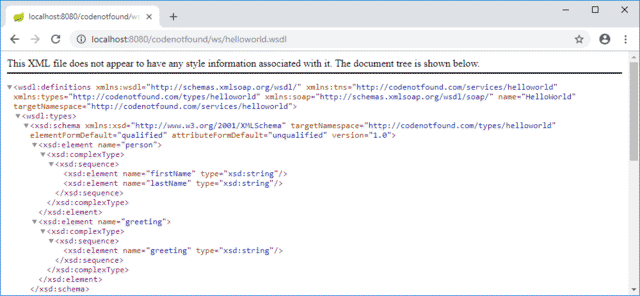
As mentioned earlier, the service WSDL is exposed on the following endpoint:
http://localhost:8080/codenotfound/ws/helloworld.wsdl.
To verify this, open the URL in a browser as shown below.
In this guide, we showed how to create a web service client and endpoint from a WSDL.
We explained Spring WS core concepts and created an end-to-end example.
If you have a question you would like to ask, or if you liked this post: drop a line below.
Thanks!